

Best Settings for Escape From Tarkov 1.0 – Max Visibility + FPS
If you want to spot enemies sooner, react faster, and stay smooth even on lower‑end rigs, optimizing graphics, postfx, and game settings in Escape From Tarkov 1.0 is essential. With many post‑processing effects, fancy lighting and render options, the default settings can often hurt visibility or choke frame rate. This guide will walk you through the ideal configuration to boost FPS and make enemies easier to spot — especially useful for competitive players, long raids, or less powerful PCs.
🎯 Core Graphics Settings for Performance & Clarity
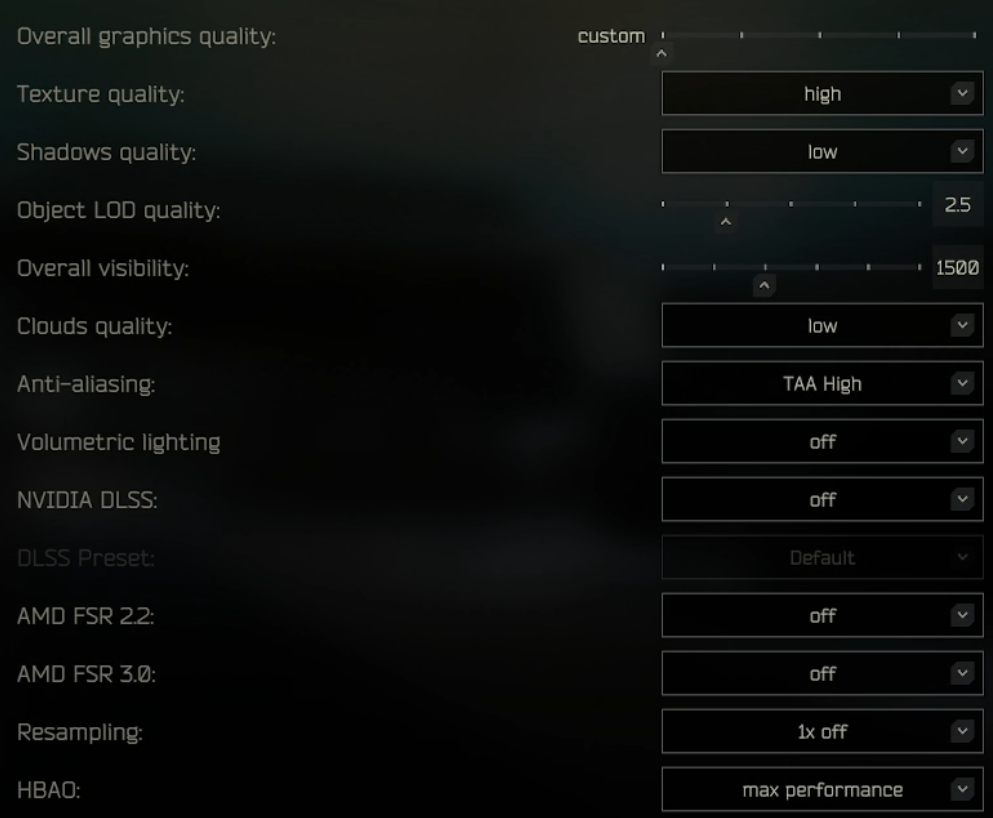
The quality graphics settings in Escape From Tarkov.
Texture Quality: Medium – High
Use Medium if your GPU has 6 GB VRAM or less. Use High if you have 8 GB+ VRAM. Lower‑quality textures reduce GPU load but can make nearby detailing muddy.
For highest clarity (especially when looting or checking close objects), Medium–High is recommended.
Shadows Quality: Low
Shadows heavily impact performance and can obscure enemy silhouettes. Low shadows dramatically improve FPS and actually help visibility — enemies in dark corners or behind objects are easier to spot.
Even on reasonably powerful rigs, keeping shadows low is a strong advantage unless you prioritize aesthetics at the cost of gameplay.
Object LOD Quality: 2.0 – 2.5
Object LOD (Level of Detail) controls how detailed objects appear at a distance. Setting it around 2.0–2.5 is the community “sweet spot” — distant objects remain recognizable without overloading GPU/CPU with unnecessary detail.
Lowering LOD reduces rendering load significantly while keeping performance-friendly visuals.
You can always turn it up to the maximum if you have a powerful gaming rig.
Overall Visibility: 1,000 – 1,500
This setting determines how far terrain, objects and players render in the distance. 1,000–1,500 gives a solid balance — far enough to spot threats, but not so far that rendering distant, irrelevant objects kills FPS.
1,000 works well for close-quarters or medium-range engagements; bump up to 1,500 if you snipe or want longer draw distance.
You can always turn it up to the maximum if you have a powerful gaming rig.
Advanced / Optional Graphics Toggles — What to Turn Off (or On)
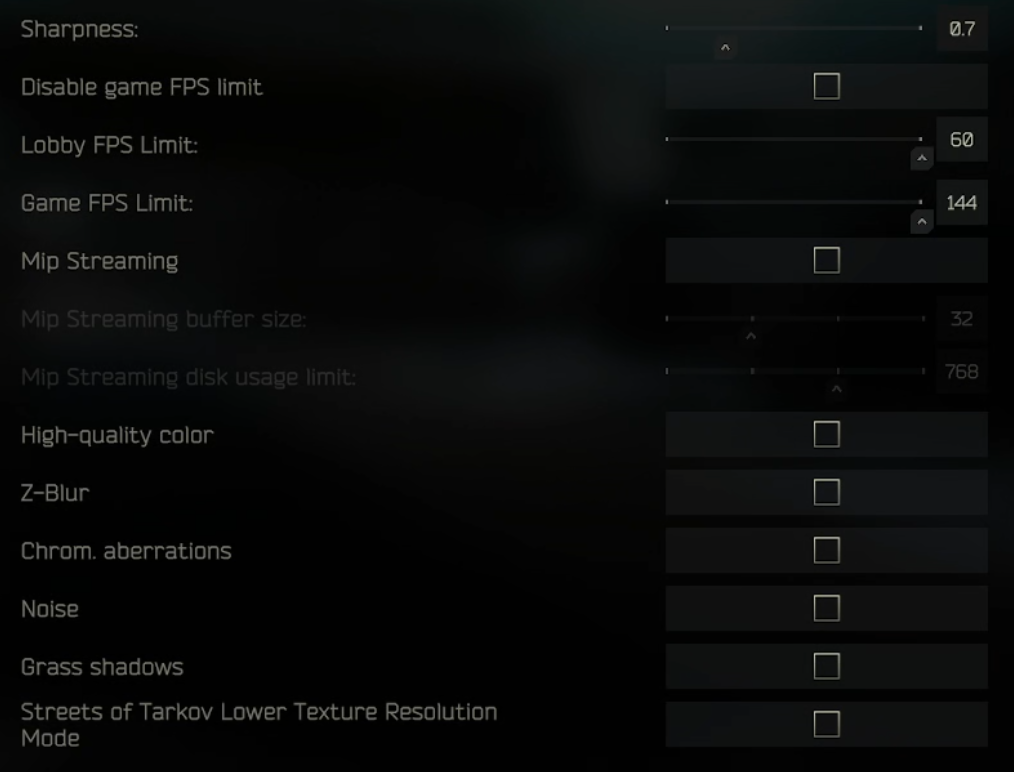
More graphics settings in escape from tarkov, on the lower part of the menu.
Anti‑Aliasing: Use TAA — gives smoother edges without major FPS hit.
Resampling / Upscalers (e.g. DLSS / FSR): Best to keep Resampling off and avoid using DLSS/FSR unless your system is struggling — upscaling can blur distant things, making enemies harder to spot.
HBAO (Ambient Occlusion), SSR (Reflections), Grass Shadows, Z‑Blur, Chromatic Aberration, Noise, Extra Volumetric Effects — turn these off or to minimum: they mostly add aesthetics but significantly impact performance and sometimes hinder clarity.
NVIDIA Reflex / Low‑Latency Modes — enable if available: this reduces input lag and can improve competitive responsiveness without huge FPS costs.
High-quality color, Z-Blur, Chrom. aberrations, Noise, Grass Shadows - Keep all of these boxes unchecked
Streets of Tarkov Lower Texture Resolution Mode - Turn on only if you get bad performance on the Streets of Tarkov map specifically.
Game Settings & UI: What to Enable / Disable for Clarity

The optimal Escape From Tarkov game settings.
From general community feedback and many player guides:
HUD elements like Stamina, Stance, Health Condition: “Always shown” — these only occupy corners and give critical info without blocking screen center.
Quick‑use bars, inventory overlays, and redundant HUD clutter: Auto‑hide / minimal — helps reduce distractions. Though you can set them to always being on if you want to be able to see your hotkeys at a glance. This is up to personal preference.
FOV: Personal preference — many prefer around 70–75, giving good peripheral vision without distortion. At least 70 is recommended.
Head-bobbing: lower values — reduces unnecessary motion blur or sway that can obscure distant targets. Turn this as low as possible.
Malfunction‑notifications: ON (so you don’t miss gun jams).
These UI tweaks ensure your field of view stays clean and focused — maximizing your chances to spot movement or enemies quickly.
🔧 PostFX Settings for Maximum Visibility in Escape From Tarkov
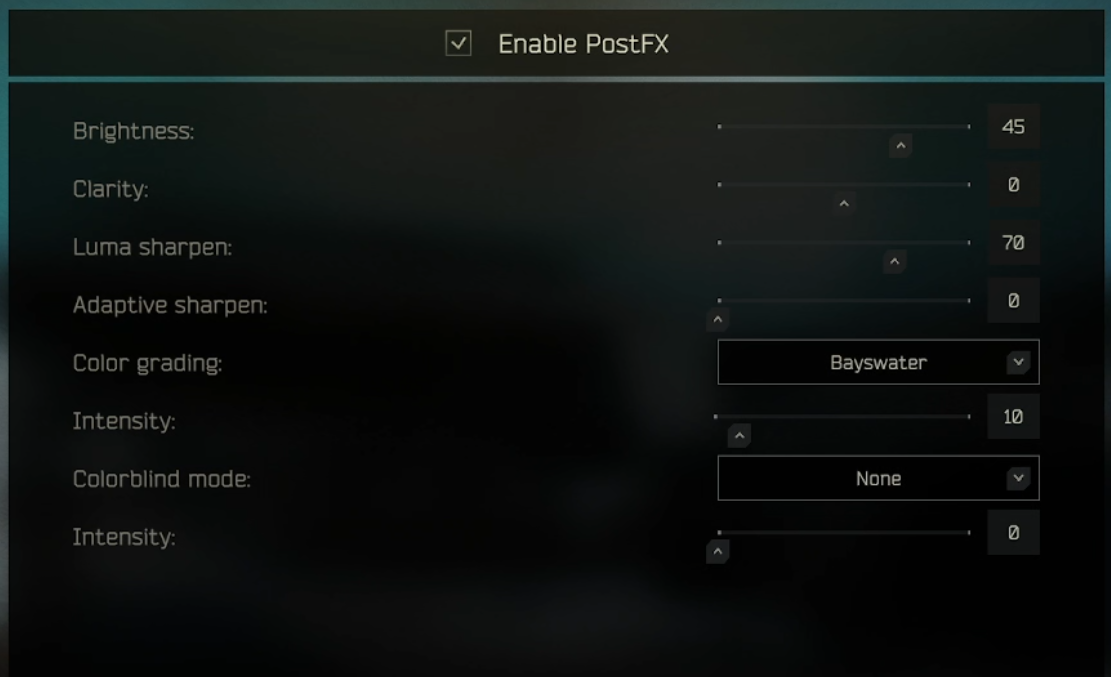
The best PostFX settings in Escape From Tarkov to see better.
Fine-tuning PostFX settings can make a dramatic difference in how clearly you see enemies in dark corners, indoor environments, and foggy weather. These settings from the screenshot are highly optimized for clarity and visibility while maintaining strong FPS:
These Escape From Tarkov PostFX settings are vital to help you see in dark corners and buildings. They give you a gigantic advantage over someone who doesn’t use them and can’t see in the dark nearly as well as you can.
✅ Recommended PostFX Setup
Brightness: 45
Gives a moderate boost to visibility in shadows and indoor areas without overexposing bright daylight zones. Helps spot enemies in places like Big Red or underground.Clarity: 0
Left at 0 to avoid introducing artificial contrast, which can sometimes cause harsh lighting that hurts long-distance visibility.Luma Sharpen: 70
This is key for enemy clarity — it sharpens only the luminance channel, which enhances definition and edge detection without adding grain or artifacts.
✅ Ideal for spotting enemy silhouettes in dim environments.Adaptive Sharpen: 0
Left off to reduce extra processing and avoid over-sharpening effects that can create haloing or edge flicker during movement.Color Grading: Bayswater
Bayswater is known for its cooler, clearer tone — it softens warm color palettes and makes reds and browns stand out more.
🔍 Excellent for factory, woods, or interchange visibility — especially indoors.Color Grading Intensity: 10
Balanced — strong enough to apply noticeable clarity and hue correction, but not so strong that it looks unnatural or filtered.
Colorblind Mode: None
Unless you have a specific need for colorblind settings, keeping this off ensures no unexpected changes to color saturation or enemy highlighting.Colorblind Intensity: 0
Since colorblind mode is disabled, intensity here has no effect — perfectly configured.
Why These Settings Work — Understanding the Tradeoffs
Escape From Tarkov is known to be CPU‑bound for many players — rendering, object draw distance, LOD, and overall visibility often impact CPU/GPU heavily. Lowering heavy graphics loads frees up resources.
High‑cost settings (shadows, reflections, AO, global illumination, high LOD) often add aesthetic flair but rarely help in a combat situation — and they often obscure enemies rather than highlight them.
Balanced settings area — medium textures, low shadows, moderate LOD & draw distance — give clarity for identifying threats (loot, players, movement) while keeping FPS stable even on mid-tier rigs.
Extra Tips: Performance Boosts Outside Game Settings
Make sure your GPU drivers and OS are up to date — outdated drivers can cause unnecessary FPS drops.
If possible, run the game on an SSD, not HDD — reduces load times when entering raids.
Monitor your RAM usage — if you have 16 GB or less, consider closing background apps to avoid memory pressure (some players treat this like a “RAM cleaner”).
Avoid unnecessary overlays, screen recorders, or streaming software while raiding — these add overhead and can reduce FPS or cause stutters.
Conclusion
Optimizing Escape From Tarkov 1.0 for visibility and FPS is more about making smart trade‑offs than maxing out every graphical slider. Use low shadows, medium/high textures, moderate LOD and draw distance, and enable these recommended post processing effects — and you’ll get a clean, sharp view that reveals enemies sooner while keeping your game smooth.
Your computers’ power may vary, but this configuration offers a solid baseline. From there, tweak based on performance and visual comfort. You’ll likely see improved FPS, quicker looting, and — most importantly — the ability to spot threats before they spot you.
See you in Tarkov. Cheeki Breeki.