


Best Loadout for Ready Or Not: Gear Up Like a Pro
Getting the right loadout in Ready Or Not can be the difference between a flawless S‑Rank run and costly failure. I’ve broken down the optimal gear choices to help you dominate tactical scenarios—whether you’re clearing rooms, securing hostages, or going stealthy. Let’s dive in.
Getting the right loadout in Ready Or Not can be the difference between a flawless S‑Rank run and costly failure. I’ve broken down the optimal gear choices to help you dominate tactical scenarios—whether you’re clearing rooms, securing hostages, or going stealthy. Let’s dive in.
You may also be interested in:
The best loadout in Ready Or Not, especially when just starting the game.
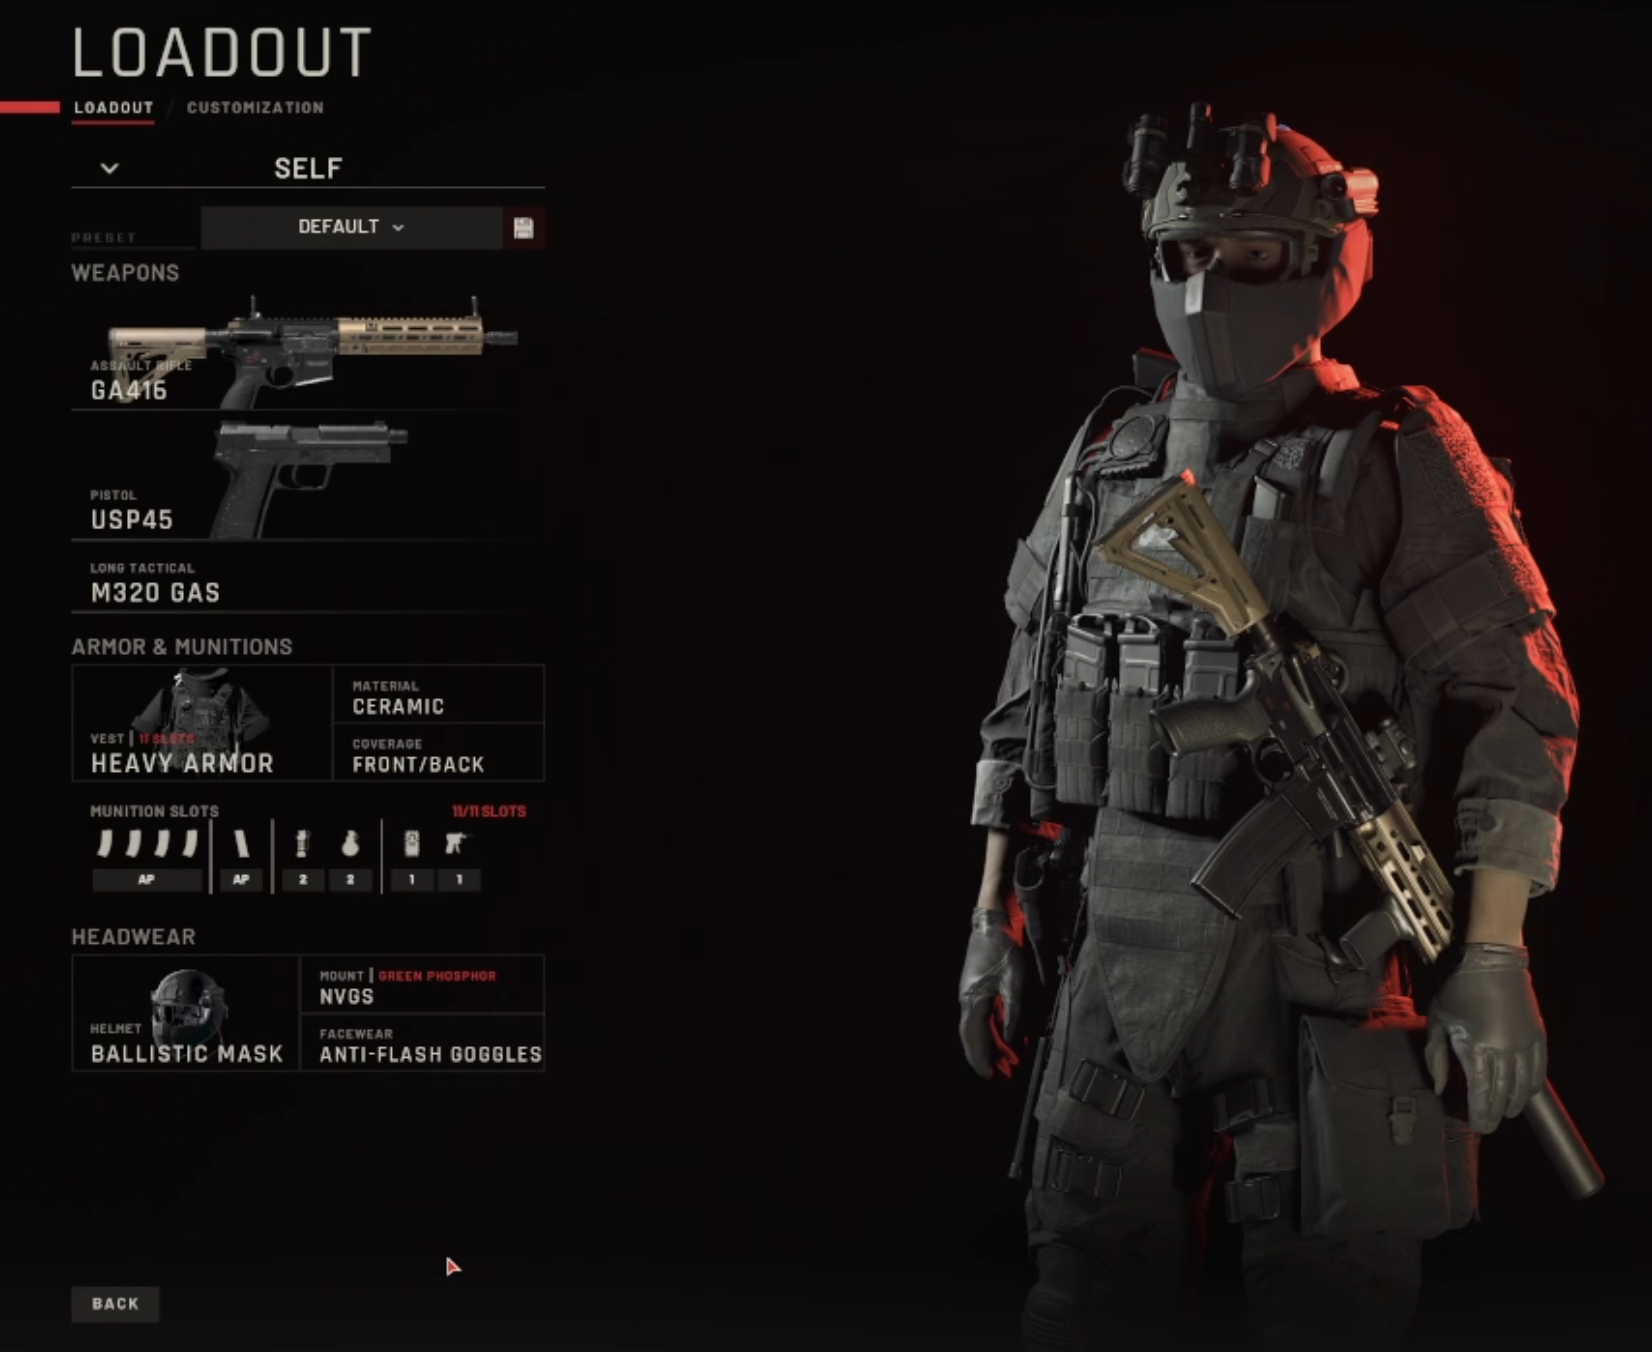
1. 🎯 Primary Weapon: Assault Rifle (MK18 or GA416)
Why choose it? Both rifles offer excellent handling, moderate recoil, and versatility across close to mid‑range combat—ideal for most maps. The MK18 is particularly praised for its agility and customizable options.
Recommended attachments:
Optic: MICROT2 – balances recoil control with quick aim.
Muzzle: SOCOM suppressor – reduces vertical recoil and conceals muzzle flash.
Underbarrel: Combat grip (or vertical grip for rifles like GA416) – helps aim stability.
Overbarrel: M600V flashlight – essential for dark rooms.
Ammo choice: AP rounds are your best bet—they ensure rounds punch through ballistic shields and plated enemies.
2. 🔫 Secondary Weapon: USP45
The USP45 is highly accurate, stable, and reliable in stressful moments.
Attachments:
Obsidian suppressor for stealth.
Laser pointer for quick target acquisition.
Ammo choice: AP rounds are your best bet—they ensure rounds punch through ballistic shields and plated enemies.
3. 🛡 Armor & Protection
Body armor: Heavy ceramic plates (front & back). This setup provides the best balance of survivability and mobility.
Armor carrier type: Ceramic is great “mid-tier”; light kevlar offers speed and can be swapped to stab vest for extra gear slots when needed.
Headwear: Make sure to wear a ballistic mask and Anti-Flash Goggles with your helmet unless you are taking a gas launcher or grenade, then wear a gas mask.
4. ⚙️ Tactical Equipment
Mirrorgun: Must-have tool for safe room entry and scouting.
M320 CS gas launcher: Perfect for subduing multiple suspects and maximizing non-lethal arrests. Remember it equip gas masks for yourself and your team mates!
Grenades + tools: Take flashbangs and C2 for controlled entries, plus a lockpick gun as backup. Wedges can also block doors in preparation for forced entry. When playing singleplayer you can have your AI teammates carry a lot of this gear. In multiplayer make sure someone has breaching charges. Everyone should have at least 2 Stinger or Flashbang grenades. Gas is just as likely to hurt as help you if you do not wear a gas mask, but can be a viable strategy as well.
5. 🎯 S‑Rank Non‑Lethal Loadout Option
Want more non-lethal arrests for S‑Ranks? Here’s a specialized build:
Primary: VPL‑25 gas rifle (CS rounds) or beanbag shotgun.
Secondary: Taser (or USPS .45 AP if lethal backup is needed).
Equip gas masks for both you and your AI team.
This setup achieves more arrests without casualties—perfect for score-focused runs.
6. ⚙️ Tuning Attachments & Gear
Use holosights or red-dot optics (EXPS3).
Add IR lasers for night operations when night vision is optimal.
7. ⚡ Reddit Quick Tips
From the Ready Or Not subreddit:
“Assault Rifles are good to start with … shotguns, when used right are the best.”
“Standard on any gun … laser, holosight and the grip that improves accuracy.”
Wrap-Up
This core loadout—**MK18/GA416 + USP45 with ceramic heavy armor, suppressors, and tactical gear—**offers deadly flexibility and reliable performance across missions. Want to go non-lethal? Swap in CS gas or bean bag shotguns and tasers for safer arrests.
Experiment with attachments and gear depending on the map and mission objectives. Mastering these loadouts will elevate your gameplay—now gear up and go earn those S‑Ranks!

Call to Arms: Gates of Hell - Ostfront: Best Units for USA Germany And USSR in Conquest Mode
In this detailed guide, we’ll explore the top 10 units for three major factions: the USA, Germany, and the USSR. These selections are not only based on sheer combat effectiveness but also their cost-efficiency, research accessibility, and versatility throughout various Conquest stages.
Call to Arms: Gates of Hell - Ostfront is a hardcore World War II real-time tactics game that emphasizes historical authenticity, tactical depth, and strategic variety. One of the core gameplay pillars in Conquest mode is selecting and upgrading units effectively across different nations. With limited research points and manpower, every choice matters.
In this detailed guide, we’ll explore the top 10 units for three major factions: the USA, Germany, and the USSR. These selections are not only based on sheer combat effectiveness but also their cost-efficiency, research accessibility, and versatility throughout various Conquest stages.
Note: The Finnish forces are also a contender in the game, especially their infantry, but they are not covered in this guide.
Top 10 Best USA Units in Call to Arms: Gates of Hell - Ostfront
The United States military in Gates of Hell: Ostfront offers a flexible balance of elite infantry, mobile firepower, and powerful support units. These top 10 picks highlight the USA’s strengths in firepower, survivability, and combined-arms effectiveness.

The USA’s Late war Stuart Gates of Hell: Ostfront unit
Veteran Rifle Squad
A surprisingly effective choice. With two Browning Automatic Rifles (BARs), rifle grenadiers, and solid health and regen stats, these squads offer a noticeable firepower boost over standard infantry. They’re accessible early, affordable, and lead into elite units like the Rangers.101st Airborne
This is arguably the best infantry unit for the USA. With two BARs, two Thompsons, a 30-cal machine gun, M9 bazooka, and multiple grenade types, the 101st brings immense firepower. Their health and stamina are excellent, making them capable of punching above their weight in nearly any combat scenario.3-Inch Gun M5 (M1 Carriage)
An exceptional anti-tank asset. With 161mm of penetration and a wide gun shield, this towed gun provides consistent reliability against medium to heavy armor. It’s better than its counterpart, the M6, in terms of both performance and survivability.75mm M1A1 Pack Howitzer
This is the second variant with a gun shield and heat rounds. Lightweight (two tow weight), mobile, and extremely versatile, it handles light armor, infantry, and emplacements efficiently. A must-have for a cheap anti tank weapon that can still stay mobile with a cheap truck.M16 MGMC Quad .50 Cal
A terror against infantry and light vehicles. The quad-mounted .50 cals on a half-track platform offer a devastating rate of fire. It also serves as effective anti-air and suppresses enemy units with ease. It’s a machine gun on steroids… because it’s 4 heavy machine guns.M20 Armored Utility Car
This seemingly unremarkable unit hides a secret—it carries a bazooka. Light, fast, and equipped with a .50 cal, it offers early anti-tank capabilities when infantry may lack punch. It’s also cheap and has decent survivability.M3 Stuart (Late Variant)
What sets this variant apart is its complement of five .30 caliber machine guns. With a 37mm cannon, decent armor, and speed, this tank becomes a mobile bullet storm. An excellent light tank for early and mid-game, especially at suppressing infantry.M4A3E8 Sherman 76mm (Field Mod)
Strong armor, excellent penetration, and a massive ammo supply for its .50 cal make this the best Sherman variant. It’s a top-tier medium tank with improved survivability and offensive capability.90mm GMC M36
This tank destroyer brings heavy firepower with 171mm penetration. Although open-topped and vulnerable to HE, it excels at ambushes and long-range AT roles. A tank hunter’s dream. Can prevent enemy tanks from advancing over a wide area.105mm HMC M7 Priest
A self-propelled gun with solid high-explosive power and mobility. Though open-topped, it brings potent indirect fire and versatility to American forces, making it a great late-game support choice.
Top 10 Best German Units in Call to Arms: Gates of Hell - Ostfront
Germany’s military forces boast powerful tanks, exceptional support weapons, and well-equipped infantry. While sometimes expensive or requiring deep research, their top units dominate when used strategically.

Germany’s Panzer 3 Ausf. N Gates of Hell: Ostfront unit
Blue Division (Spanische Blau Division)
Incredible cost-efficiency and stats. They boast elite-tier health and stamina (on par with Fallschirmjäger) and come with an MG34, semi-auto rifles, and a solid grenade loadout. Easily one of the best infantry for cost.Panzerjäger I
Early game anti-tank capability for a low cost. Armed with a 4.7cm gun with decent penetration, this lightly armored tank destroyer is great for handling light and medium threats. Quick to unlock and devastating early on and through to the mid game.7.5cm LeIG 18 Light Infantry Gun
The best all-around support weapon. It offers both HE and HEAT shells, capable of eliminating infantry, buildings, and even light armor. Low pop cap and high fire rate make it a staple support unit. Fantastic for backing up infantry with direct fire.Brandenburgers
Elite stealth infantry. With MG42s, good stats, and the stealth perk, they are ideal for ambushes and recon sabotage. Their versatility and high damage make them a strong offensive asset.Flammpanzerwagen Sd.Kfz. 251/16
Best flame support vehicle. Comes with dual flamethrowers and an MG42. While lightly armored, it’s cheap, mobile, and can incinerate entire enemy squads in seconds. Just be careful where you put it.Panzer III Ausf. N
Medium support tank with a short 75mm gun. Its HEAT rounds are excellent for anti-armor roles, while HE clears infantry. Affordable and effective, especially in urban or mixed combat zones.StuH 42
A heavy-hitting assault gun with a 10.5cm main gun. Capable of dealing with fortified positions and heavy armor thanks to powerful HE and HEAT ammo. Resilient and useful throughout mid to late game.Grille (3cm Mk 103 variant)
Insanely high rate of fire and good armor penetration. Equipped with a 3cm auto-cannon and high magazine capacity, it’s deadly against infantry and light vehicles. A rare but potent support option.Jagdpanther
Arguably the best heavy tank destroyer for the Germans. Combines King Tiger firepower (88mm gun) with better mobility and slightly lower cost. Its sloped armor provides strong protection, making it a late-game menace.Tiger I Ausf. H
Iconic and deadly. Comes with smoke launchers, thick armor, and the infamous 88mm gun. While expensive and high on the research tree, its battlefield dominance makes it worth the cost in most Conquest campaigns.
Top 10 Best Soviet Units in Call to Arms: Gates of Hell - Ostfront
The USSR shines in aggressive, cost-effective units with overwhelming firepower. Soviet units often offer better survivability and value, even if they sometimes lack the finesse of Western counterparts.

The Soviets’ SU 100 Gates of Hell: Ostfront unit
Assault Engineers (Sapper Squad)
Armored, high health, and equipped with PPSh-41s and flamethrowers. These elite infantry squads dominate close-quarters combat. Tough, deadly, and well-armed.Ampulomet
This underrated incendiary launcher is cheap and horrifyingly effective. Lob fire bombs at enemy infantry, buildings, and even tanks. Excellent for terror and area denial.57mm ZiS-2 AT Gun
High-velocity anti-tank gun with outstanding penetration. Fast firing, long-ranged, and devastating to enemy armor. A must-have in the mid to late stages.120mm Mortar
Versatile and powerful. Comes with HE, smoke, and incendiary shells. Offers extended range and tactical utility unmatched by other nation’s mortars.BM-31-12 Andryusha (Katyusha)
The most devastating rocket artillery system. Expensive, but it wipes entire zones with 12 massive 300mm rockets. Ideal for breaking entrenched positions or devastating AI bases.T-60 Light Tank
Armed with a 20mm autocannon, this light tank shreds infantry and light vehicles. Cheap, nimble, and excellent for early game rushes or support.KV-8 Flame Tank
Massive armor and a powerful flamethrower. This heavy support tank is a walking inferno that’s extremely difficult to destroy. Great for leading urban assaults.SU-100
One of the best Soviet tank destroyers. Armed with a 100mm gun and good armor, it makes short work of Tigers and Panthers. High pop cap, but extremely lethal.SU-122
Combines 122mm HE power with HEAT rounds for armor penetration. Great for both anti-tank and anti-personnel roles. Mobile and surprisingly affordable for what it offers.IS-2 Model 1945
One of the strongest heavy tanks in the game. Exceptional armor, a powerful 122mm gun, and a .50 cal make it ideal for spearheading late-game offensives. Tough, impactful, and visually imposing.
Conclusion: Choosing the Right Tools for Victory
Each nation in Call to Arms: Gates of Hell - Ostfront offers a distinct playstyle. The USA excels with versatile and mobile combined-arms tactics, Germany leverages elite troops and high-tech support, while the USSR floods the field with armored behemoths and cost-efficient firepower.
Whichever faction you prefer, these top units provide a powerful foundation for any Conquest campaign. Whether you're laying down suppressive fire with quad .50s, sneaking Brandenburgers behind enemy lines, or unleashing a hellstorm with Andryusha rockets, mastering these units can make the difference between victory and defeat.
While this article covers only the three primary factions, don't sleep on the Finnish forces—though smaller in scale, they bring unique capabilities that deserve their own spotlight.

Squad Best Settings Guide: Optimize for Performance & Clarity
If you're looking to squeeze the best frames per second from Squad, this guide on the Best Squad Settings has you covered. We’ll walk through essential tweaks to improve FPS, visuals, and gameplay experience.
If you're looking to squeeze the best frames per second from Squad, this guide on the Best Squad Settings has you covered. We’ll walk through essential tweaks to improve FPS, visuals, and gameplay experience.
1. Graphics Settings: Low Overrides
To hit peak performance, drop your settings low—especially shadows and effects. Many players confirm that playing low is optimal. Playing the game on low is actually the most optimal way to play Squad, cutting out effects and removing shadows is a way of being able to see enemies better.
Turning off shadows and reducing foliage significantly boosts FPS and makes targets clearer—essential for the Best Squad Settings.
2. Window Mode & Framerate Caps
Switch your game to Fullscreen for reduced input lag and better performance stability. Some players don’t see much difference with borderless, but Fullscreen is generally recommended.
Limit your FPS cap to 90–120 in-game and around 60 for the menu. This smooths frame pacing and reduces hitching.
3. Anti‑Aliasing & Resolution Scale
Use TAA or FXAA sparingly. Supersampling blurs less than standard AA but is heavier on FPS. In-engine AA with 8× samples is a balanced “Best Squad Setting”. For instance, enabling AA with 8 samples provides clarity without major slowdown.
4. Texture Quality & Filtering
Set texture quality to Medium with anisotropic filtering around 8×. Checking "uncap texture pool size" helps if you have 8 GB VRAM. This combination offers good visuals without throttling performance.
5. Environment & Particle Effects
Low environment quality drastically boosts FPS in major battles. However, leave particle quality higher—you want explosions and smoke to look epic. That adds atmosphere without killing frame rates.
6. Field‑Of‑View (FOV)
Set FOV to around 95–100. That extra peripheral vision helps spotting enemies at long range, especially in dense environments.
7. Driver & OS Tweaks
Disable Steam Overlay, GeForce Experience, and shader caching—they can cause hitching
Use the Ultimate Performance power mode on Windows
Keep GPU drivers updated
These system-level adjustments ease background load and smooth your Squad Best Settings experience.
8. DLSS & NVIDIA Settings
If you have an NVIDIA GPU, turning on DLSS can boost FPS without huge clarity loss. Meanwhile, use app-specific control in the NVIDIA panel:
Turn off MFAA, FXAA
Set power mode to Normal
Fast Vsync
Disable shader cache
Quick Recap: The Best Squad Settings Summary
Window Mode: Fullscreen Resolution Scale: 100% Max FPS: 90–120 in-game; 60 menu Graphics Quality: Custom – low environment, medium textures, medium particles AA: On with 8× samples or TAA/FXAA Anisotropic Filtering: 8× Shadows: Off or Low FOV: ~95–100 DLSS: Enabled if available
By combining these Squad Best Settings, you should notice smoother gameplay, reduced stutters, and better visual clarity—providing a gameplay edge. You’ll hit higher, more consistent FPS while keeping the game looking sharp.
Happy gaming—and may your squads be well‑coordinated!

Helldivers 2 Illuminate Guide – How to Counter Every Unit and Structure
The resurgence of the Illuminate—also known in the community as the squids—marks one of the most challenging phases in Helldivers 2 history. These squid-like aliens, long thought to be extinct, have returned with upgraded units, mind-controlled armies, and deadly energy-based technology.
The resurgence of the Illuminate—also known in the community as the squids—marks one of the most challenging phases in Helldivers 2 history. These squid-like aliens, long thought to be extinct, have returned with upgraded units, mind-controlled armies, and deadly energy-based technology.
For any Helldiver hoping to survive on the frontlines, understanding each enemy type is no longer optional—it’s critical. This comprehensive Helldivers 2 illuminate guide breaks down every known unit and structure, helping you prepare loadouts, strategems, and tactics for every encounter.
Whether you're taking on grotesque Flesh Mobs, dodging Interloper strafes, or disabling arc-scrambling Cognitive Disruptors, mastering this faction requires specific knowledge and precision. Let’s dive into the squiddy abyss and dissect everything you need to know about defeating the Helldivers illuminate forces.
You may also be interested in:
Voteless – Mind-Controlled Cannon Fodder

The Helldivers 2 Illuminate Voteless
The Voteless are the most common frontline troops used by the Helldivers illuminate forces. Created from captured and mutated Super Earth citizens, they swarm battlefields in large numbers. Despite appearing weak at first glance, Voteless can lunge unexpectedly and deal surprising damage—usually killing a Helldiver in just two to three hits. Their behavior mimics Terminid scavengers, but with a more humanoid aggression and unpredictability.
In this Helldivers 2 illuminate guide, it's important to note that Voteless lack armor, making them highly vulnerable to automatic fire and shotguns. Crowd control weapons like the SG-225 Breaker, AR-23P Liberator Penetrator, and incendiary or cluster stratagems are ideal for thinning them out. For squads, area-denial tools like the A/ARC-3 Tesla Tower or other Sentries are invaluable for managing their numbers.
Keep your distance and maintain mobility. When multiple Voteless surround you, kiting becomes ineffective, so dispatch them before they can lunge. Treat them as high-priority targets during high-pressure moments—not for their individual power, but for the overwhelming chaos they create in swarms.
Flesh Mob – Gigantic Voteless Abomination

The Helldivers 2 Illuminate Flesh Mob
If the Voteless are unsettling, then the Flesh Mob is the stuff of nightmares. A grotesque fusion of multiple Voteless, this massive creature is a true bullet sponge with a colossal health pool of 6,000 HP—equivalent to a Bile Titan. The Helldivers squids built this monstrosity for brute force intimidation.
This is where explosive weaponry shines. According to the most up-to-date Helldivers 2 illuminate guides, the Wasp Launcher can drop a Flesh Mob in about four hits, while the Autocannon or MG-43 Machine Gun can bring it down with sustained, focused fire. The arms are resistant to explosive damage, so avoid targeting them. The heads and legs, despite having smaller health pools, transmit damage more effectively to the core.
The Flesh Mob’s attack cycle includes a slow swipe combo and a sudden charge after it emits a howl. The charge is lethal, even against ultra-light armor. Dodge to the side or dive-roll to avoid its path. If you can’t escape, pre-stimming may increase your odds of surviving long enough for a revive. The flesh mob isn’t just a target, it’s a mission hazard.
Overseers – Standard Elite Infantry

The Helldivers 2 Illuminate Overseer
The Overseers represent the base-tier elite soldier of the Helldivers illuminate faction. These units are armed with polearms capable of both melee slashes and ranged energy bolts. When damaged, they deploy a shimmering blue energy shield that can absorb extensive punishment. They're deceptively durable and capable of overwhelming solo players if not handled with focus fire.
Their armor type is classified as light to medium across the body, but the head remains the most vulnerable point. The best tactic in this Helldivers 2 illuminate guide is to target the head when exposed, and aim for the legs when the shield is active to stagger the Overseer and open a vulnerability. Explosives and high-penetration rifles like the AMR-87 Anti-Materiel Rifle or R-36 Eruptor are particularly effective.
Don’t underestimate their melee. The polearm can one-hit kill an unarmored Helldiver. Keep a safe distance, stagger them early, and prioritize flanking maneuvers with teammates. These units are common but deadly, making them a prime focus during Illuminate-heavy missions.
Elevated Overseers – Aerial Ambushers

The Helldivers 2 Illuminate Elevated Overseer
Among the most mobile units in the Helldivers illuminate roster, Elevated Overseers use advanced jetpacks to hover and strafe above the battlefield. These agile enemies combine mobility with deadly firepower, shooting bursts of plasma bolts that resemble those from the PLAS-1 Scorcher. They also toss Illuminate grenades with decent area damage, which can be thrown back.
Unlike their ground-based counterparts, Elevated Overseers lack energy shields, making them slightly more vulnerable. However, their ability to stay airborne and fire from awkward angles makes them highly dangerous. This Helldivers 2 illuminate guide recommends targeting their exposed jetpack as a weak point. A single well-placed shot can disable them midair and send them crashing down.
Auto-tracking weapons like the Spear or the Wasp Launcher perform well here. Medium to high penetration weapons like the R-36 Eruptor or the LAS-99 Quasar Cannon can also be effective when timed during their brief hovering pauses. Coordination is key—don't let them split your team’s attention or you'll be overwhelmed from above.
Crescent Overseers – Heavy Artillery Specialists

The Helldivers 2 Illuminate Crescent Overseer
The Crescent Overseer is a newer and more lethal member of the Helldivers squids lineup, designed to provide long-range explosive firepower. Equipped with a massive shoulder-mounted plasma mortar, it can engage Helldivers from behind cover or across long distances. These enemies are a serious threat due to their high burst damage and ability to flush out entire squads from defensive positions.
Unlike the base Overseer, Crescent variants do not use shields, but they do have light armor plating across their body. Their heads are weak points with medium armor and little HP, meaning high-precision shots from weapons like the AMR-87 or the Senator can take them down quickly. Alternatively, explosive weapons like the Scorcher or EAT-17 can cut through their armor and hit the core body health directly.
A critical tactic in this Helldivers 2 illuminate guide is to avoid clumping up when Crescent Overseers are nearby. Their artillery splash damage can incapacitate or wipe teams instantly. Use vertical cover, mobility packs, and high DPS automatics to stagger or kill them before they can unleash barrages. If you see that shoulder glow—it’s time to reposition immediately.
Watchers – Reinforcement Beacons

The Helldivers 2 Illuminate Watcher
Watchers are the eyes and ears of the Helldivers illuminate army. These drone-like scouts patrol key locations and emit a blue vision cone. If a Helldiver enters this field of view, the cone turns purple and the Watcher goes on alert. If not killed quickly, it launches a burst of white flares into the sky, signaling squid Warp Ships to drop in reinforcements.
When reinforcements are not possible—due to mission limits or map objectives—Watchers become aggressive, firing electric stun bolts at their target. This disables movement and can chain with attacks from other Illuminate units. The stun effect is similar to the A/ARC-3 Tesla Tower or ARC-12 Blitzer, making them deceptively dangerous even without backup.
The best strategy in this Helldivers 2 illuminate guide is to eliminate Watchers preemptively before they alert enemy ships. Silenced weapons, orbital strikes, or well-placed sniper shots are the ideal tools for the job. If you're spotted, act fast—every second counts before that flare hits the sky and brings the pain. For stealth-focused missions, Watchers are top-priority targets.
Interloper (Stingray) – Fast, Deadly Aircraft

The Helldivers 2 Illuminate Interloper
The Interloper—nicknamed the Stingray by the community—is one of the most frustrating units in the Helldivers 2 illuminate faction. With high speed, midair maneuverability, and lethal strafing runs, it’s designed to punish stationary players and disrupt squad cohesion. This Helldivers 2 illuminate guide must stress that this unit is not optional to kill—it will hunt Helldivers across the entire map if left unchecked.
This aircraft has decent HP and medium armor, with its thrusters being the weakest point. Most of the Interloper is well armored, making high-penetration or explosive damage necessary. This means tools like the Wasp Launcher, Recoilless Rifle, or even precise autocannon shots are highly effective. Tracking weapons are especially valuable like the Spear or Wasp, because it mitigates the interloper’s speed when trying to fire at it.
When preparing for missions that involve the Helldivers illuminate faction, always watch out for the interloper, and shoot it down quickly when it shows up. The Interloper’s attack sequence starts with a hover phase, drawing a blue path across the ground to indicate its strafing path. Dive, or jump pack away the moment this begins. Prone position can also reduce damage taken by 90%, but it's a risky tactic. These squids don’t miss.
Harvesters – Massive Tripodal War Machines

The Helldivers 2 Illuminate Harvester
One of the most imposing threats in the Helldivers illuminate arsenal, Harvesters are three-legged mechanical giants armed with both a central death beam and short-range arc discharges. They look straight out of The War Of The Worlds. While they may move slowly, their shielded presence and persistent line-of-sight scanning make them one of the hardest enemies to confront without teamwork.
Harvesters constantly emit a shield bubble similar to the SH-32 Generator Pack used by Helldivers. Inside this bubble, they can soak an extreme amount of damage. Periodically, they unleash a laser from their eye that instantly melts targets, and if players get too close, they blast out electric arcs reminiscent of the ARC-12 Blitzer. This Helldivers 2 illuminate guide emphasizes breaking the shield as your top priority.
Use high-burst stratagems like the Orbital Airburst Strike, Eagle Cluster Bomb, or Gatling Barrage to breach the shield. Once it’s down, aim for the legs using explosives like the EAT-17 or Recoilless Rifle. Tripod joints are particularly vulnerable once exposed. Always call out their location to your team—they can’t sneak, but they can decimate.
Illuminate Warp Ships – Deployers and Objectives

The Helldivers 2 Illuminate Warp Ship
These saucer-like crafts are not just reinforcements—they're key objectives in many Helldivers 2 illuminate missions. Found parked in enemy encampments, Illuminate Warp Ships must be destroyed to halt the flow of illuminate forces entering the battlefield. Depending on difficulty, you’ll encounter one (Light), two (Medium), or up to four (Heavy) ships in an area.
Each ship is protected by a blue bubble shield, which regenerates rapidly. To disable the shield, either time explosive impacts precisely or use demolition force weapons strong enough to punch through. This Helldivers 2 illuminate guide highlights tools like the Orbital 120mm HE Barrage, Eagle 500kg Bomb, and Orbital Laser as reliable options for destroying Warp Ships outright—even with shields up.
If attacking from ground level, throw thermite grenades or set up missile hits while the shield is down. A direct grenade or explosive projectile into the ship’s glowing door can cause an immediate detonation. These objectives are critical to controlling battlefield tempo. Clear them early to stop waves of Voteless and Overseers from pouring in mid-mission.
Oh, and when a Watcher calls in Warp Ships as reinforcements then you should know that you can shoot them out of the sky before they drop any troops if you are fast enough. Aim for the circular blue glowing hole in the center that the troops come out of. Hitting it with a sufficiently heavy weapon such as a recoilless rifle will bring the whole thing crashing down.
Illuminate Monolith – High-Priority Destruction Targets
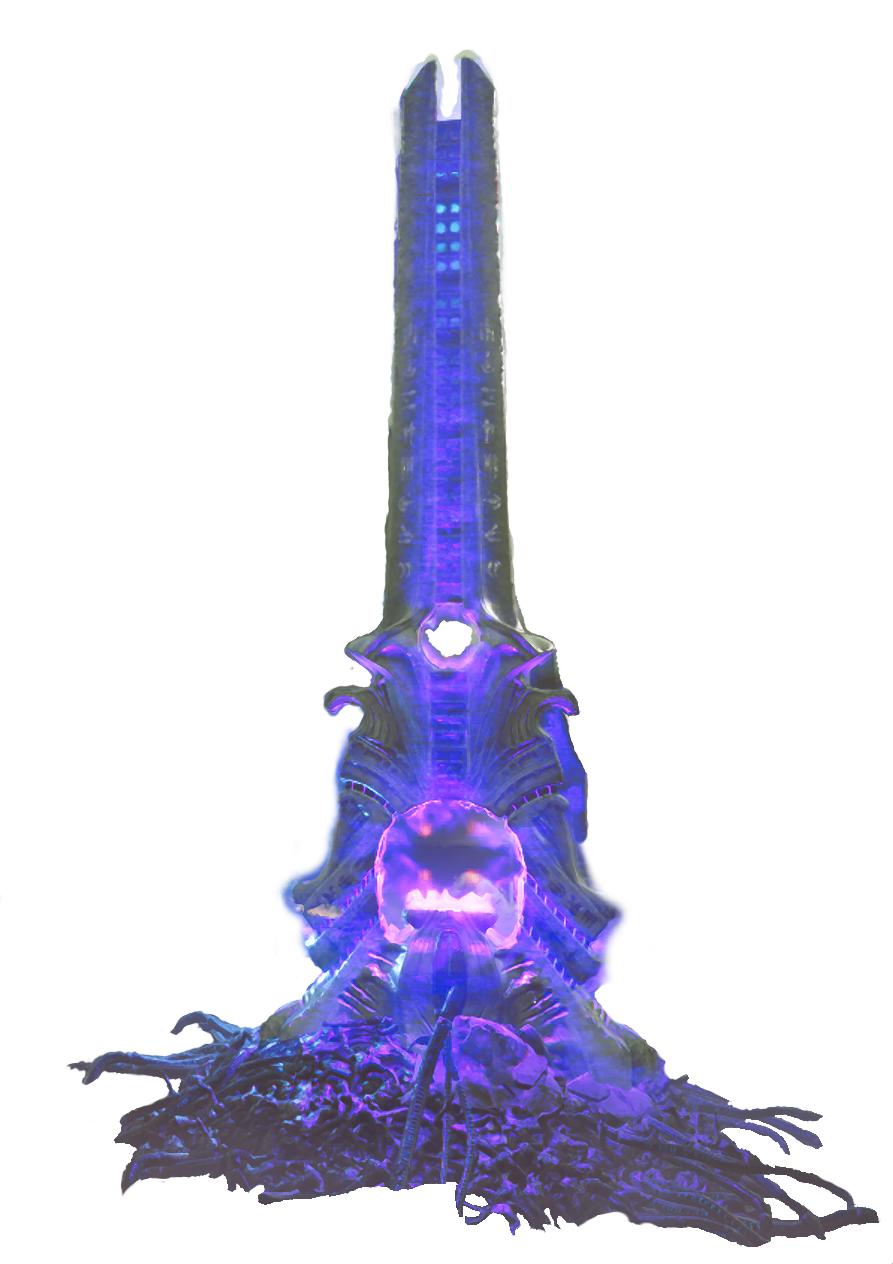
The Helldivers 2 Illuminate Monolith
Few structures are as mysterious—and as dangerous—as the Monoliths. These towering constructs pulse with unknown energy and regularly emit chilling voice lines that can be heard by all players in the mission zone. In every Helldivers 2 illuminate guide, the Monolith is considered a high-priority objective, not just for lore significance, but for gameplay impact.
To destroy a Monolith, Helldivers must call down and detonate a Hellbomb in close proximity. This is easier said than done, as the structure often sits at the heart of heavily defended encampments filled with Overseers, Watchers, and Warp Ships. The Monolith itself cannot be damaged by regular weapons or explosives—only the Hellbomb will work.
Getting close means fighting through waves of Helldivers squids, dodging artillery from Crescent Overseers, and managing reinforcements from nearby structures. Use defensive stratagems like shield generators or mortar sentries to hold the perimeter while the Hellbomb arms.
Cognitive Disruptor – Stratagem-Scrambling Structures

The Helldivers 2 Illuminate Cognitive Disruptor
The Cognitive Disruptor is one of the most uniquely frustrating mechanics in Helldivers 2. These large, glowing constructs emit a field that randomly scrambles the inputs for every stratagem in the area. Instead of familiar arrow combos, players will see randomized codes that change every few seconds. This mechanic alone earns it a prime spot in every serious Helldivers 2 illuminate guide.
There are two ways to disable a Cognitive Disruptor destroy its four attached energy conversion panels found around colonial power equipment. Until it's disabled, using any stratagem becomes a gamble. Reinforcements, supply drops, and orbital strikes all risk failure if mistyped. This forces players into on-the-fly adaptation. Try to take down the disrupter as soon as possible.
Understanding Illuminate Armor and Weak Points
The complexity of the Helldivers illuminate faction isn't just in their variety of units—it’s in how those units absorb damage. Almost every enemy in the Helldivers 2 Illuminate lineup features different armor values on different body parts, requiring players to shift their targeting and weapon choices accordingly. Some enemies, like the Voteless, have no armor at all, while others, such as Overseers and Interlopers, rely on light to medium armor in key zones.
A crucial tactic emphasized in this Helldivers 2 illuminate guide is to understand the distinction between structural damage resistance and armor penetration. For example, weapons that deal explosive damage bypass armor resistances, making them ideal against units like the Crescent Overseer and Flesh Mob. Meanwhile, enemies like Elevated Overseers can be taken down effectively by targeting their exposed jetpack, even with standard ballistic weapons.
Always aim for the head when engaging Overseers—it’s the most vulnerable hitbox. For Warp Ships or armored legs of a Harvester, switch to weapons with high demolition force or medium-to-heavy penetration. Learn to adapt your aim mid-fight; many Helldivers squids rely on stagger zones (like legs or joints) to create vulnerability windows.
Effective Loadouts for Illuminate Missions
Loadouts can make or break your squad when going up against the Helldivers 2 illuminate forces. Each unit demands a different damage profile, and no single weapon covers them all. The best squads bring a balanced mix of high-DPS automatics, anti-armor precision rifles, and heavy explosives. Flexibility and coordination are key.
For primary weapons, the AR-23P Liberator Penetrator and R-36 Eruptor are top-tier due to their armor penetration and stagger capabilities. The MG-43 Machine Gun is excellent for suppressing Voteless swarms and staggering Overseers. In terms of support weapons, the Recoilless Rifle and Autocannon dominate against Warp Ships and Harvesters. Always bring one or two explosive options for dealing with Monoliths and Disruptors.
This Helldivers 2 illuminate guide strongly recommends including stratagems like the Eagle 500kg Bomb, Orbital Laser, and Mortar Sentry for their utility against both structures and groups of Helldivers squids. Still, there are a wide array of stratagems that are useful. Most of all make sure you can both deal with the hordes of voteless as well as heavily shielded and armored ship and harvesters.
Armor and Perks – Staying Alive Against Squids
Surviving encounters with the Helldivers illuminate faction isn’t just about firepower—it’s about wearing the right gear. Many Illuminate attacks involve energy, arc, and explosive damage, making your choice of armor more critical than ever. Lightweight builds may allow for more speed, but they rarely survive an Interloper’s strafing run or a Crescent Overseer’s plasma mortar.
For most Illuminate-heavy missions, this Helldivers 2 illuminate guide recommends medium armor with explosive resistance. The CM-09 Bonesnapper or SC-34 Infiltrator offer balanced durability with passives that improve stamina regen or damage resistance. If you're facing multiple Interlopers or fighting in Monolith zones, consider arc-resistant armor to mitigate Watcher and Harvester shock effects.
As for perks, “Fortified” and “Democracy Protects” give significant boosts to survivability. Pairing the right passive with situational awareness can make the difference between surviving a Flesh Mob charge and ending up ragdolled across the map. Customize for each mission, and don't underestimate the value of staying alive just a few seconds longer—it can win an entire objective. Most of all make sure you can both deal with the hordes of voteless as well as heavily shielded and armored ship and harvesters.
Fighting the illuminate is unlike any other enemy in Helldivers 2. Their tech-savvy behavior, mind control, and advanced tactics lead many players to make costly mistakes. One of the biggest errors is underestimating Watchers. If left unchecked, they summon wave after wave of reinforcements, turning manageable missions into chaotic disasters.
Final Tips for Illuminate Missions
Mastering the Helldivers illuminate threat requires more than firepower—it demands discipline, coordination, and a strategic mindset. Always scout objectives before committing, eliminate Watchers immediately, and prioritize Warp Ship destruction. Keep an eye on Interlopers above, and never assume a Monolith zone is safe until it’s detonated.
The best squads are those that adapt. Loadouts should reflect the enemy composition, and stratagems should cover all ranges. And remember: even with the perfect build, all it takes is one Flesh Mob charge or Harvester beam to end a mission.
This Helldivers 2 illuminate guide is your frontline briefing—everything beyond this comes down to skill, teamwork, and the will to enforce Managed Democracy. Suit up, drop in, and show the Helldivers squids that Liberty is non-negotiable.
You may also be interested in:
The Illuminate are no longer a forgotten legend—they are back, stronger, smarter, and more dangerous than ever. This Helldivers 2 illuminate guide has armed you with the knowledge to identify, counter, and conquer every enemy and structure they bring to the battlefield. From devastating Harvesters to precision Watchers, and from Monoliths to Warp Ships, you now have the blueprint for victory.
Adapt your loadout, work as a team, and never hesitate to strike first. The war for Super Earth continues, and it’s up to you to ensure the Helldivers illuminate threat is extinguished once and for all.

Master Helldivers 2 Weapon Customization
Helldivers 2 has introduced a whole new layer of personalization with its weapon customization system, offering players unprecedented control over their primary weapon. This system allows for deep optimization with optics, underbarrel attachments, magazines, and more, fundamentally changing how players approach combat with various Helldivers weapons.
Helldivers 2 has introduced a whole new layer of personalization with its weapon customization system, offering players unprecedented control over their primary weapon. This system allows for deep optimization with optics, underbarrel attachments, magazines, and more, fundamentally changing how players approach combat with various Helldivers weapons.
To unlock the full potential of Helldivers 2 weapon customization, players must first level up their primary weapons. Experience is gained through completed operations, with harder difficulties and more objectives resulting in faster progression. Blitz missions are particularly effective for leveling, making them a go-to strategy for those eager to access high-level mods.
Weapons can reach a max level of 25, and each level unlocks new attachment options that allow players to tailor their Helldivers weapons to fit specific playstyles or mission requirements.
You may also be interested in:

Go to the armory on your Super Destroyer in Helldivers 2 to customize weapons.
Upon reaching level 10, players can access the customization screen in the armory. Here, weapon stats such as recoil, sway, ergonomics, and reload speed are clearly displayed and affected by the attachments chosen. Recoil, split into horizontal and vertical types, plays a critical role. Horizontal recoil, being less predictable, is generally more detrimental than vertical recoil and should be minimized with appropriate attachments.
The Helldivers 2 weapon customization system provides various ways to mitigate recoil. For instance, muzzle brakes reduce horizontal recoil, while compensators help control vertical recoil. Flash hiders offer balanced recoil suppression with moderate penalties, making them a safe choice for many builds. These components drastically impact how a weapon feels, especially when combined with movement and stance modifiers—crouching or going prone reduces recoil significantly.
Equally important are underbarrel attachments, with vertical foregrips offering the most control at the cost of ergonomics, and angled foregrips doing the reverse. Players using Helldivers weapons with high fire rates should generally favor vertical grips for improved control, while marksmen might lean toward angled grips or ergonomics-boosting options for faster target acquisition. Flashlights and lasers can also be integrated into these attachments, adding utility at the cost of a small performance trade-off.

This is the Helldivers 2 weapon customization screen.
Optics are a critical part of Helldivers 2 weapon customization, affecting both ergonomics and precision. Larger scopes offer enhanced zoom but decrease responsiveness, while removing optics altogether significantly boosts target acquisition speed. Red dots and reflex sights strike a middle ground, providing fast sighting without the bulk of high-magnification scopes. These choices let players optimize for visibility, range, or reflexes based on mission environments and enemy types.
Magazine customization further refines a weapon's battlefield role. Short mags improve reload speed and ergonomics but reduce sustained firepower. Extended and drum magazines offer higher capacity at the cost of reload time and mobility. Since Helldivers 2 often pits players against hordes, more bullets between reloads is typically preferable. However, lightweight builds may benefit from faster reloading and higher agility.
Unique among the arsenal are energy-based Helldivers weapons like the Scythe, which use heat sinks instead of magazines. These can be tailored for high capacity or fast dissipation, impacting how long the weapon can fire and how quickly it resets. This adds another strategic element to Helldivers 2 weapon customization, especially in long, attrition-heavy fights.

Once you’ve customized your Helldivers 2 Weapons go and enjoy using them!
Shotgun users aren’t left behind either. While muzzle attachments don't affect recoil stats for these weapons, they do alter choke spread. Players can choose wider spreads for crowd control or tighter patterns for precision. The duckbill attachment, for instance, turns a shotgun into a screen-clearing tool at close range, while full chokes improve reach and accuracy.
Not every weapon supports the full range of attachments, however. Some Helldivers weapons are locked into specific roles or aesthetics for balancing purposes. That means players must experiment and explore to discover which loadouts best suit their tactics. Fortunately, the game provides three customizable loadout slots per weapon, plus a default setting, enabling users to switch between presets quickly.
Helldivers 2 weapon customization isn’t just about aesthetics—it’s a deeply strategic system that rewards experimentation and adaptation. Whether you're tuning for stealth, firepower, or control, the key is understanding how each attachment influences your gun's performance in live combat. Mastering these tools ensures your Helldivers weapons are always mission-ready, no matter the challenge.
With the right build, any weapon can become a precision instrument of liberation. Dive into the customization screen, optimize every detail, and take the fight to the enemy with gear that reflects your combat philosophy.